Wednesday, June 19, 2013

Bee Themed Classroom

My Bee-Themed Classroom

From the year 2000-2011, I was a self-contained second grade teacher at Joe Hall Elementary. During those years, my second grade classroom was decorated in a Bee Theme. I was the Queen Bee and my second graders were my worker bees. In 2011, I started teaching fourth grade gifted. That year I knew I had to change my theme into something more age appropriate; a little bit more mature. That year I retired my bee theme and switched over to a Hollywood Theme. You can see pictures of my Hollywood Theme here.

Why do I decorate my room in theme? Well, it's simple. By creating a year long theme in my classroom, I am creating a sense of unity as soon as my students walk-in through the door. The main goal for me as a teacher is to build a community in my classroom. Making my diverse students feel like a united group of individuals. I also work hard to make my classroom a place where where my students can feel safe, excited, and motivated to learn. Implementing a class theme each year is the perfect way for me to achieve my goal.

Having a classroom theme also makes my work easier. It determines how I decorate my room, name tags, letterheads, emails, weekly newsletter, group names, etc... It saves me times so that way I can focus on the important things like instruction and lesson planning. My classroom theme does not determine what I teach academically, it just creates a fun learning environment that allows my students to come alive and feel excited to be a part of a shared experience during the school year.

My Bee Themed Classroom (2000-2011)


My Beehive
The Beehive was my favorite feature in my bee-themed classroom. 
My husband made it using PVC pipes that I bought at Home Depot. I then spray painted the pipes yellow and had my mother in law sew the fabric together to create the beehive. I used it in my classroom library as a reading nook. My students loved to sit inside the beehive and read a book. 


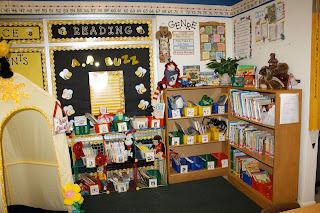
Bee-Themed Library
My classroom library had a large green area rug, and the tags on my book bins were yellow. I decorated my bulletin boards in yellow and black to stay true to the theme. 

More Pictures
Below are more pictures of my bee-themed classroom.


Thursday, October 4, 2012

Interactive Notebook

This year I decided to start using Interactive Notebooks. First, I strongly believe that the Interactive Notebook will enable my students to become more creative, independent thinkers, and writers. Secondly, they will give structure to all my lessons, organization, and problem solving strategies. Moreover, they will allow me to gain insight into my students' abilities, opinions, understandings, and misconceptions about the lesson/skill at hand. Lastly, Interactive Notebooks are an easy way for me to incorporate differentiated instruction and meet the needs of every student in my class.

What Is An Interactive Notebook?
Interactive Notebooks are a valuable tool that can help strengthen student learning of curriculum through increased student interaction and participation. These notebooks are used in my class daily to help my students learn and keep track of their learning progress. This notebook uses both the right and left-brain hemispheres to help sort, categorize and be creative with newly attained knowledge. The left side of the notebook is used for writing down information given by me such as notes, vocabulary, formulas, examples, etc... The right side of the notebook shows the understanding and references the information from the right side through self worked examples, reflections, drawings, figures, etc... The benefits for my students are endless because they become more organized and can easily access their work and notes quickly.

Why Notebook?
Well for starters, I was tired of students not utilizing their notes, losing their papers, and not remembering the previously learned concepts. With the Math Interactive Notebook, students now have the opportunity to reflect on their strategies and assess their own learning. They can practice putting their knowledge into words both verbally and in writing. Futhermore, by using the notebook, instructional focus suddenly starts to shift from computation to problem solving and real-life application. The Interactive Notebook serves as a documented portfolio-like record of student growth and progress. Finally, the Interactive Notebook is an open-ended and naturally differentiated assessment tool.

Notebook Supplies:
  • Composition book
  • Highlighters (at least four different colors)
  • Glue Stickes
  • Colored Pencils (Basic 8 colors)
  • Scissors
Why Are Interactive Notebooks Different?

Left side pages are used to write down learn-able content
  • Class notes
  • Discussion notes
  • Textbook notes
  • Graded Test
Right side pages are used to process the right side notes with
  • Problem of the Day (warm up)
  • Independent Practice Problems
  • Graphic Organizers (Frayer Model, Foldables, Venn Diagrams...)
  • Glued Assignments
  • Glued Quiz/Test Corrections
The Pros and Cons

Pros
  • Everyone has the same notes in the same place.
  • Student engagement, responsibility, and organization
  • Students will actually use their notes.
  • Helpful for student review
  • Used for future math classes
  • Quick Assessment tool
  • Every year you don't have to re-invent the wheel.
Cons
  • For the teacher, it is a lot of work and planning to set up.
  • Stolen or lost notebooks
  • New students mid sememster
  • Damaged notebooks
One workbook that I recently purchased that has helped me tremendously when it comes to planning and creating foldables is Dinah Zike's Notebook Foldables for Spiral, Binders, & Composition Books. I highly recommend this workbook if you decide to start working with Interactive Notebooks.


I also created an Interactive Notebook PowerPoint Presentation that I use at the beginning of the school year when we start setting up all of our Notebooks. You can find my Powerpoint by visiting my teacher store at Teachers Pay Teachers and edit it to suit your needs. 


Here are samples of entries inside my Interactive Notebooks. 
(I have one notebook for each subject.)
Scientific Method Foldable.

            Place Value Foldable  

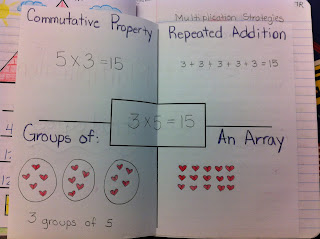
  Multiplication Strategies Foldable

Multiplication Properties Foldable

Multiplication & Division Fact Family House (Door Opens!)

Chapter Vocabulary Foldable with Examples

Algebraic Expressions

Character Traits & Story Evidence

Character Traits

Saturday, September 8, 2012

Onomatopoeia Project

        For the past week I've been teaching my students all about Onomatopoeia words. I picked up several library books that feature Onomatopoeia words and read them out loud to my class. The children loved listening to the stories. I wanted to show them how easy it is to incorporate Onomatopoeia words in their writing. Onomatopoeia words can make a story more enterataining and bring any story to life.
Here is a list of books I recommend using when introducing Onomatopoeia Words. Hopefully these stories will inspire your children to make some noise in their own writing.

Tiny Little Fly.  Michael Rosen.  Candlewick, 2010.
All the Water in the World.  George Ella Lyon and Katherine Tillotson.  Atheneum, 2011.
Bob.  Tracey Campbell Pearson.  Farrar, Straus and Giroux, 2002.
Can You Growl Like a Bear? John Butler.  Peachtree, 2007.
Click, Clack, Moo : Cows that Type.  Doreen Cronin.  Simon & Schuster, 2000.
Dear Fish.  Chris Gall.  Little Brown, 2006.
Double Trouble in Walla Walla.  Andrew Clements.  Millbrook Press, 1997.
Five Green and Speckled Frogs. Priscilla Burris.  Scholastic, 2003
I Stink! Kate McMullan.  HarperCollins, 2002.
I’m Bad!  Kate McMullan.   HarperCollins, 2008.
I’m Dirty. Kate McMullan.  HarperColins, 2006.
In the Tall, Tall Grass. Denise Fleming.  Holt, 1991.
Ker-splash!  George O’Conner.  Simon & Schuster, 2005.
The Little Old Lady Who Was Not Afraid of Anything. Linda Williams.  HarperCollins, 1986.

        From all the books above, I only read two stories to my class and displayed the rest of them on the back table. I welcomed my students to read them during the week whenever they were done with their work and had free time. After introducing Onomatopoeia words, I assigned the Onomatopoeia Project to my students. I gave the children a list of Onomatopoeia Words and had them pick their favorite one. Then, I told them that I wanted them to animate their words on a construciton paper. I told them to be creative and make their word come to life. I told them they can use tissue paper, cotton, glitter, make their word 3-D, etc... The children took their projects home and here are the end results. :)


Saturday, September 1, 2012

Our Plastic Lockers

I want to give special thanks to several moms for purchasing plastic drawers and donating them to my classroom. Genius! Why didn't I think of this before? These moms purchased a set of eight drawers at Target and brought them to my classroom as a surprise. I place two sets at the end of each group of tables. Now my students have more room inside their desk and books/papers don't get torn or bent out of shape. I have assigned a drawer for each student and have labeled them with their names. Now, each student can use his/her drawer to hold his/her belongings. It serves as a little plastic locker and keeps my classroom cluther free as well as keeps all their books and folders off the floor. Love it!!!

Thank you moms!!! I truly love it and appreciate your generosity.


Tuesday, August 28, 2012

Hollywood Theme

This school year I've decided to go with a Hollywood Movie Theme. Since I am teaching a fourth grade self-contained gifted class, and these students are the "STARS" of the school, I figured that the Hollywood/Stars theme would be perfect for this school year. I am going to include pictures of my classroom to show you what my Hollywood themed class looks like. I'll be adding more pictures in the future.

This is our classroom library. It is categorized in alphabetical order by author. I also have each book categorized by lexile level.

Our classroom treasure chest. Students get tickets from me throughout the week for "Doing the Right Thing." They put their names on their tickets and drop them off in the ticket box at the end of each day. On Fridays, I usually draw two tickets from the ticket box. The two names chosen earn a trip to the Treasure Box.

This is our classroom job charts. All students are assigned a number at the beginning of the year. I rotate their clothespins each week to make sure everyone gets a chance to do each job.

This is my corner of the room.

Down the center of the classroom is our Hollywood Walk of Fame. There is one star for each student. I had each student sign his/her name on their star in cursive. I ordered these star stickers from here.

My front door was "POPPING" on the first day of school! I got this idea with the popcorn popping from Pinterest. I also gave my students the red carpet treatment. My students absolutely loved it.  

This year my students have O.S.C.A.R. Folders. O.S.C.A.R. stands for Organizing Students Communication And Resources. This folder is used as my communication folder between home and school. Inside it has two pockets, the left pocket reads "Keep at Home" and the right pocket reads "Return to School." The students are suppose to bring this folder to school everyday. I purchased my O.S.C.A.R. Folder from Nicky's Folders. I truly love them because they are sturdy and last all year long.

Here is my "Meet the Cast" bulletin board. I can't wait for my parents to see it on Open House. I dressed up the children in old vintage Hollywood style clothing and I printed their Hollywood pictures in black and white. Next to their pictures they wrote their Star Bio's. I purchased and downloaded the Star Bio's from the Teacher's Clubhouse. They have a huge selection of Hollywood premade worksheets for your classroom. If you're also doing a Hollywood theme, I highly recommend you check out their website.

My "Reel"y Great Work Bulletin Board. I hardly have time to be changing bulletin boards, but because I have a classroom theme, I can keep the same bulletin board up all year and only change the work.

I had this basket full of popcorn out on my back table for Open House.

For Open House my parents left with this packet and a bag of popcorn.

I rolled out red bulletin board paper for Open House to welcome my parents. It was a huge hit!